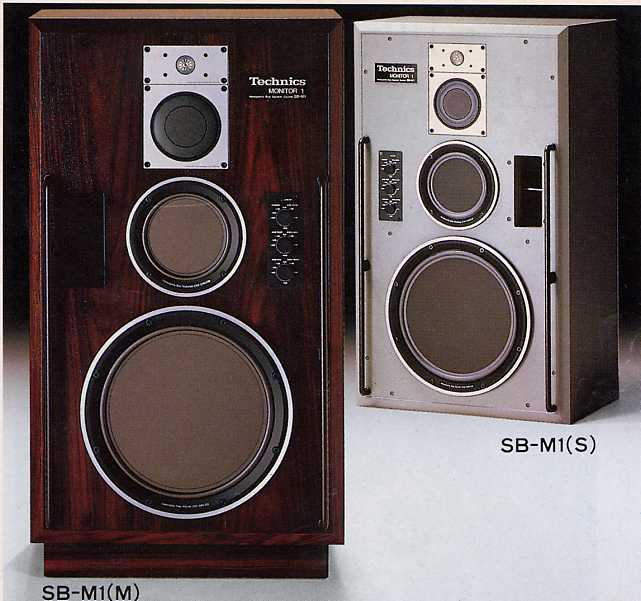
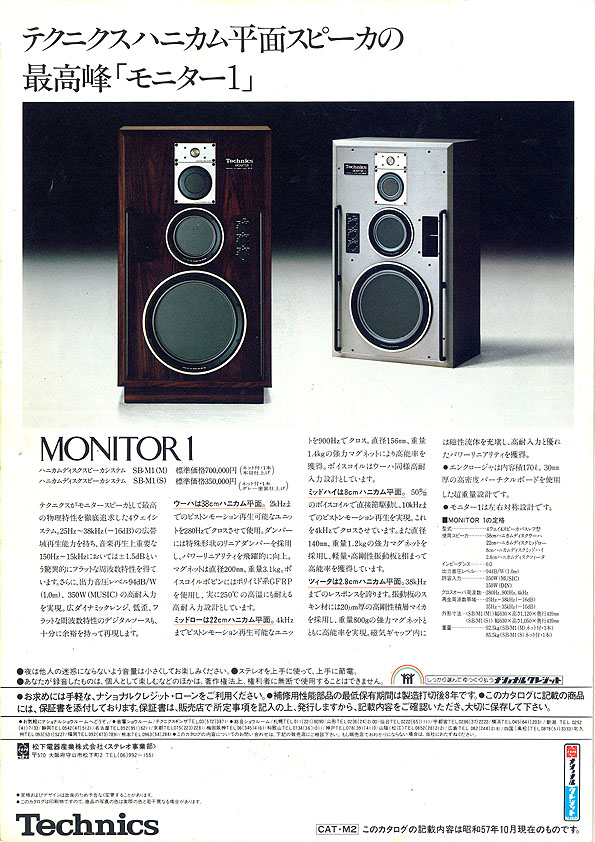
Technics SB-M1 Introduction & Description
|
 |
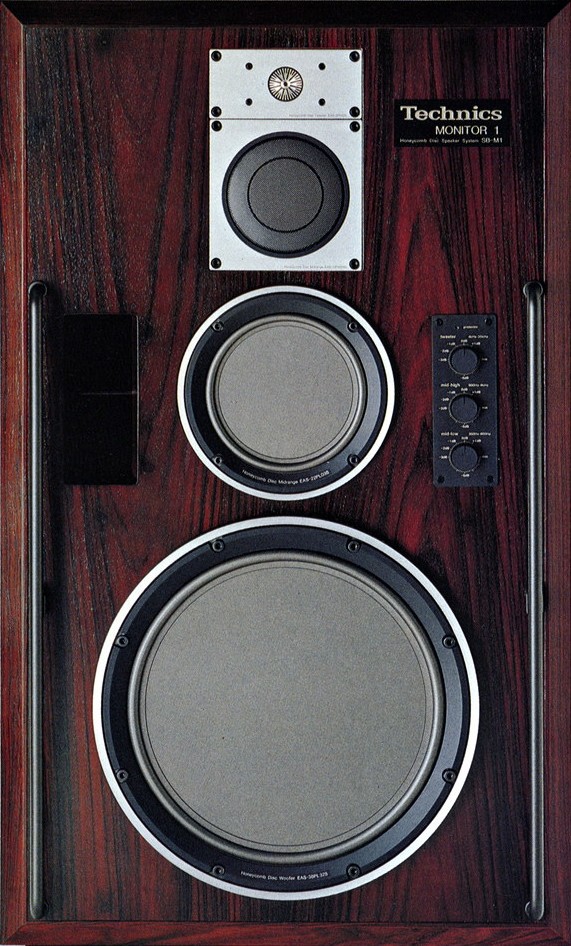
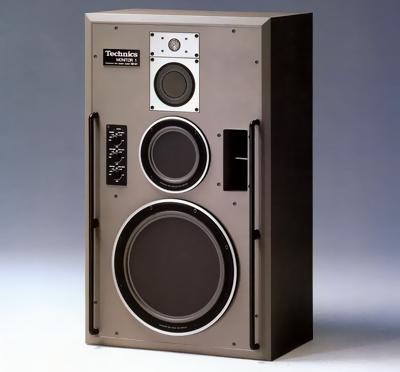
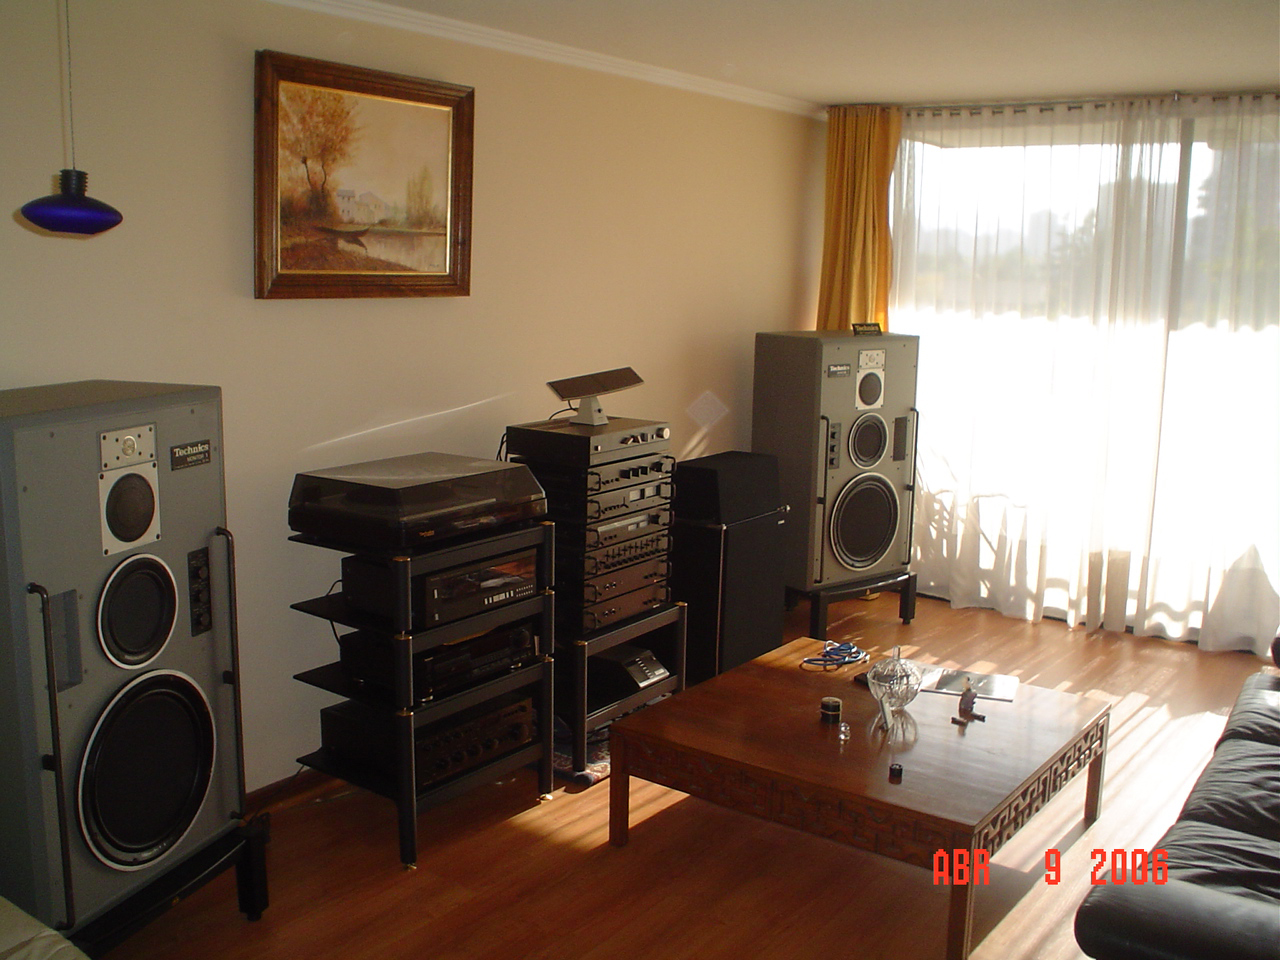
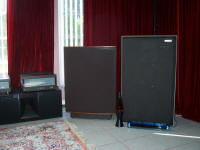
The Technics SB-M1 speaker system is one of the rarest high end
components of the classic early 1980's
Technics line and I think that this is the
only web page for them in existence that is written by somebody that
actually owns a pair today. My SB-M1's came to me from their first
owner who was a marketing director at a Technics studio back in that era
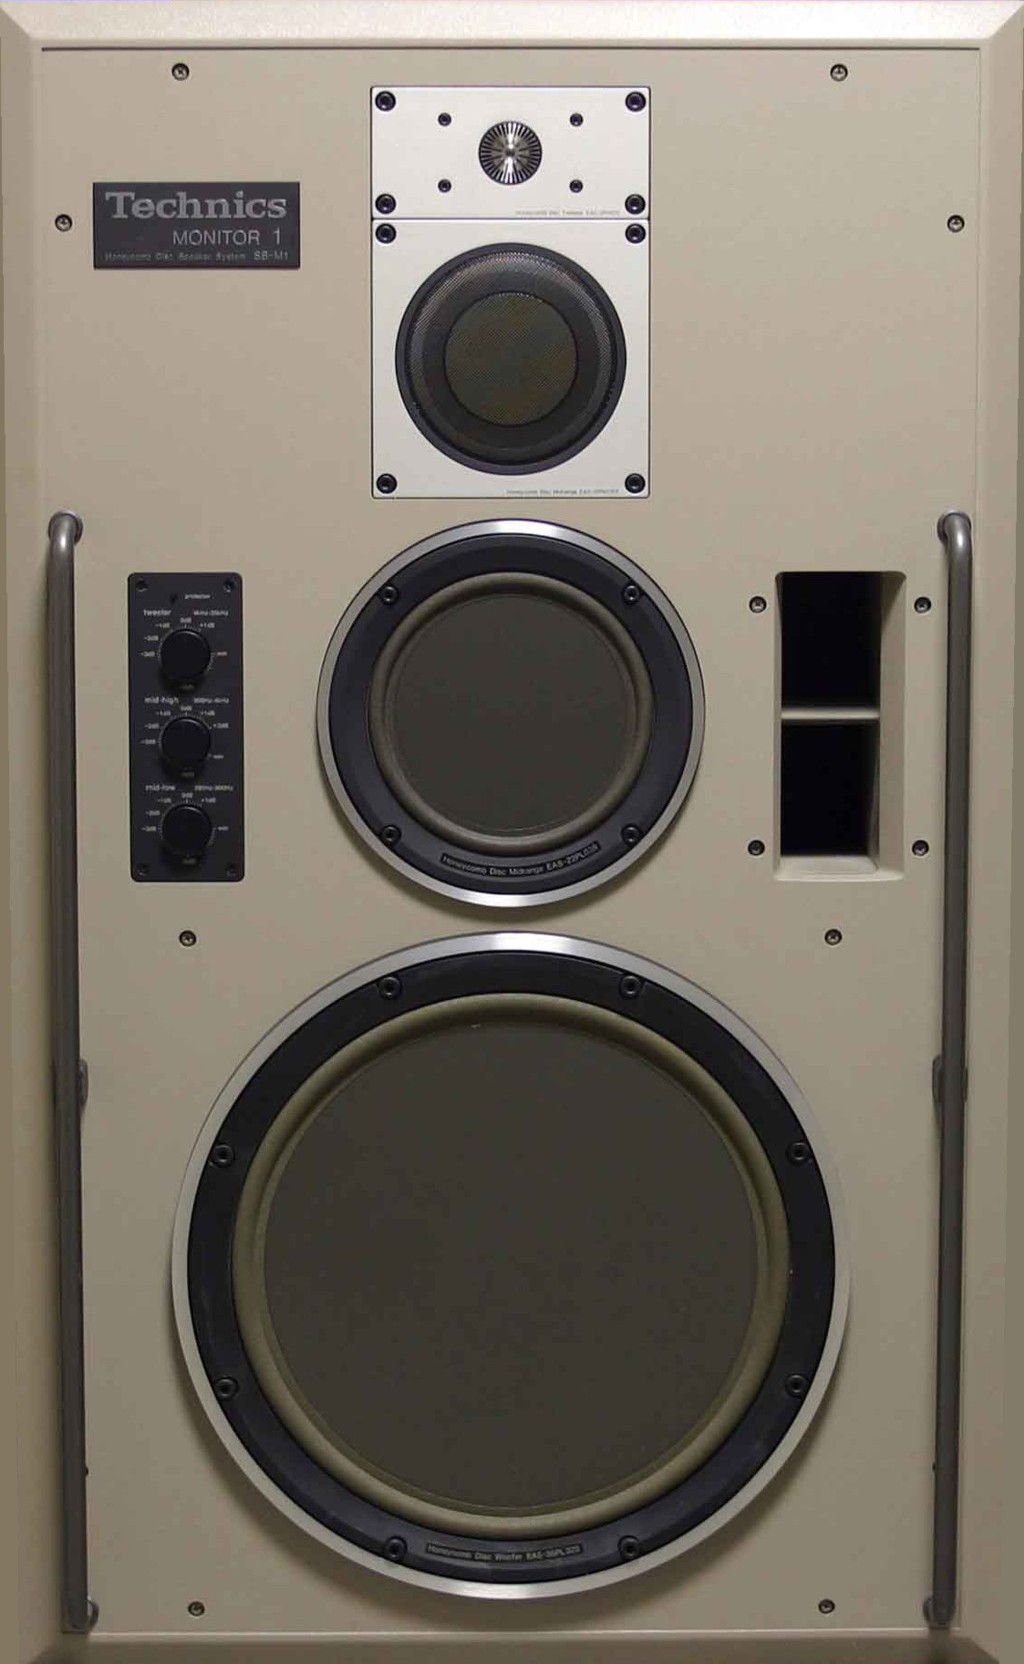
and these are from his personal home system. These SB-M1's are in
fact the SB-M1S studio model. They are finished in a kind of creamy
grey color and they remind me of the color of early digital telephony
switching equipment of the same era. So the first question I asked
the seller
was if he had ever seen any SB-M1(M)'s which are the beautiful rosewood
finished home version and he indicated that those were indeed around in
the USA at the time and there were some in his studio, but even he with
his big Technics discounts would not pay the extra for that beautiful
wood! The cost was literally double! What a shame (for me that is). Weighing in at a
massive 188.5 lbs each with the M versions weighing even more, they
are literally so heavy that lifting and moving them takes careful
planning if you don't want to kill yourself. Click
here for
the user manual. |
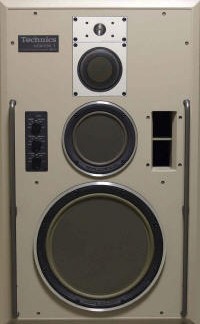 |
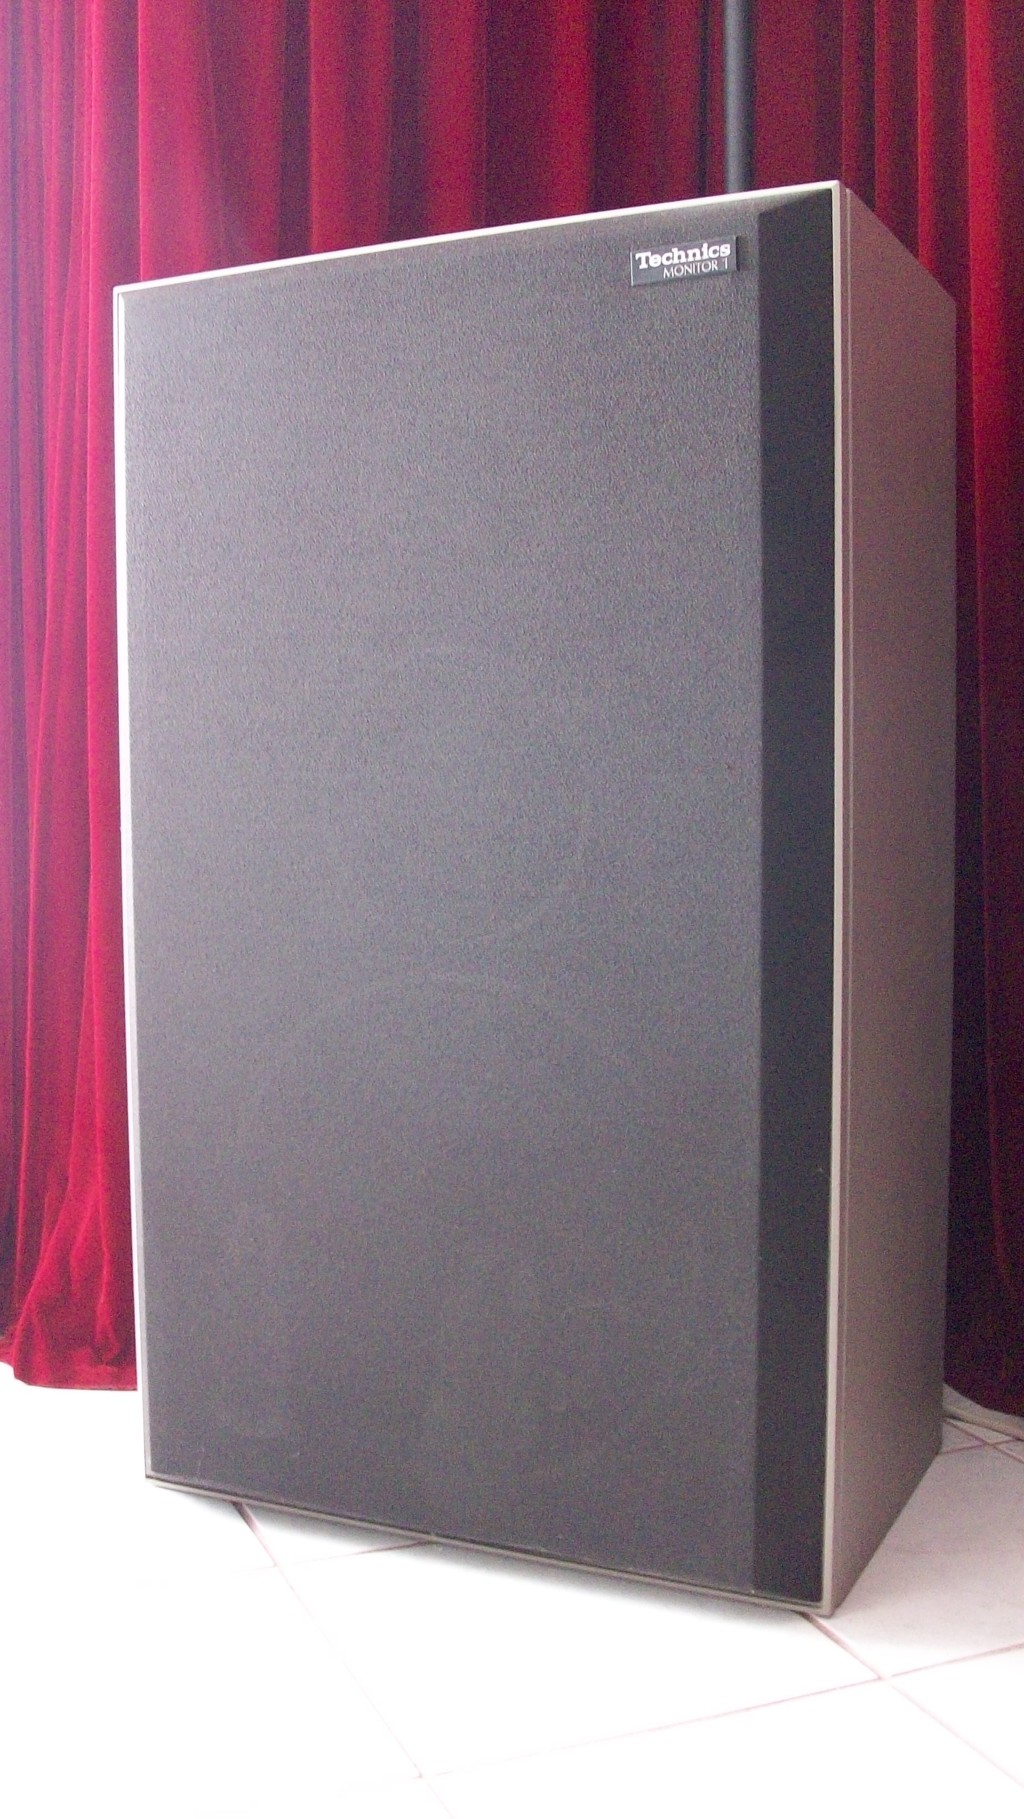
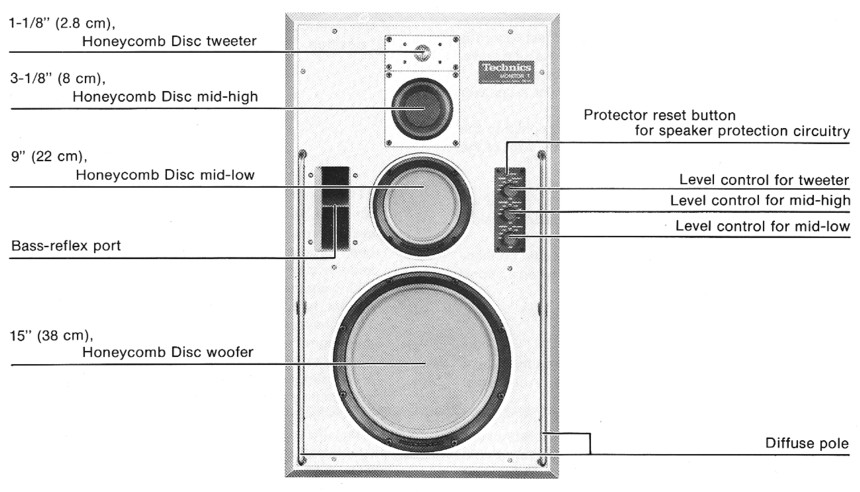
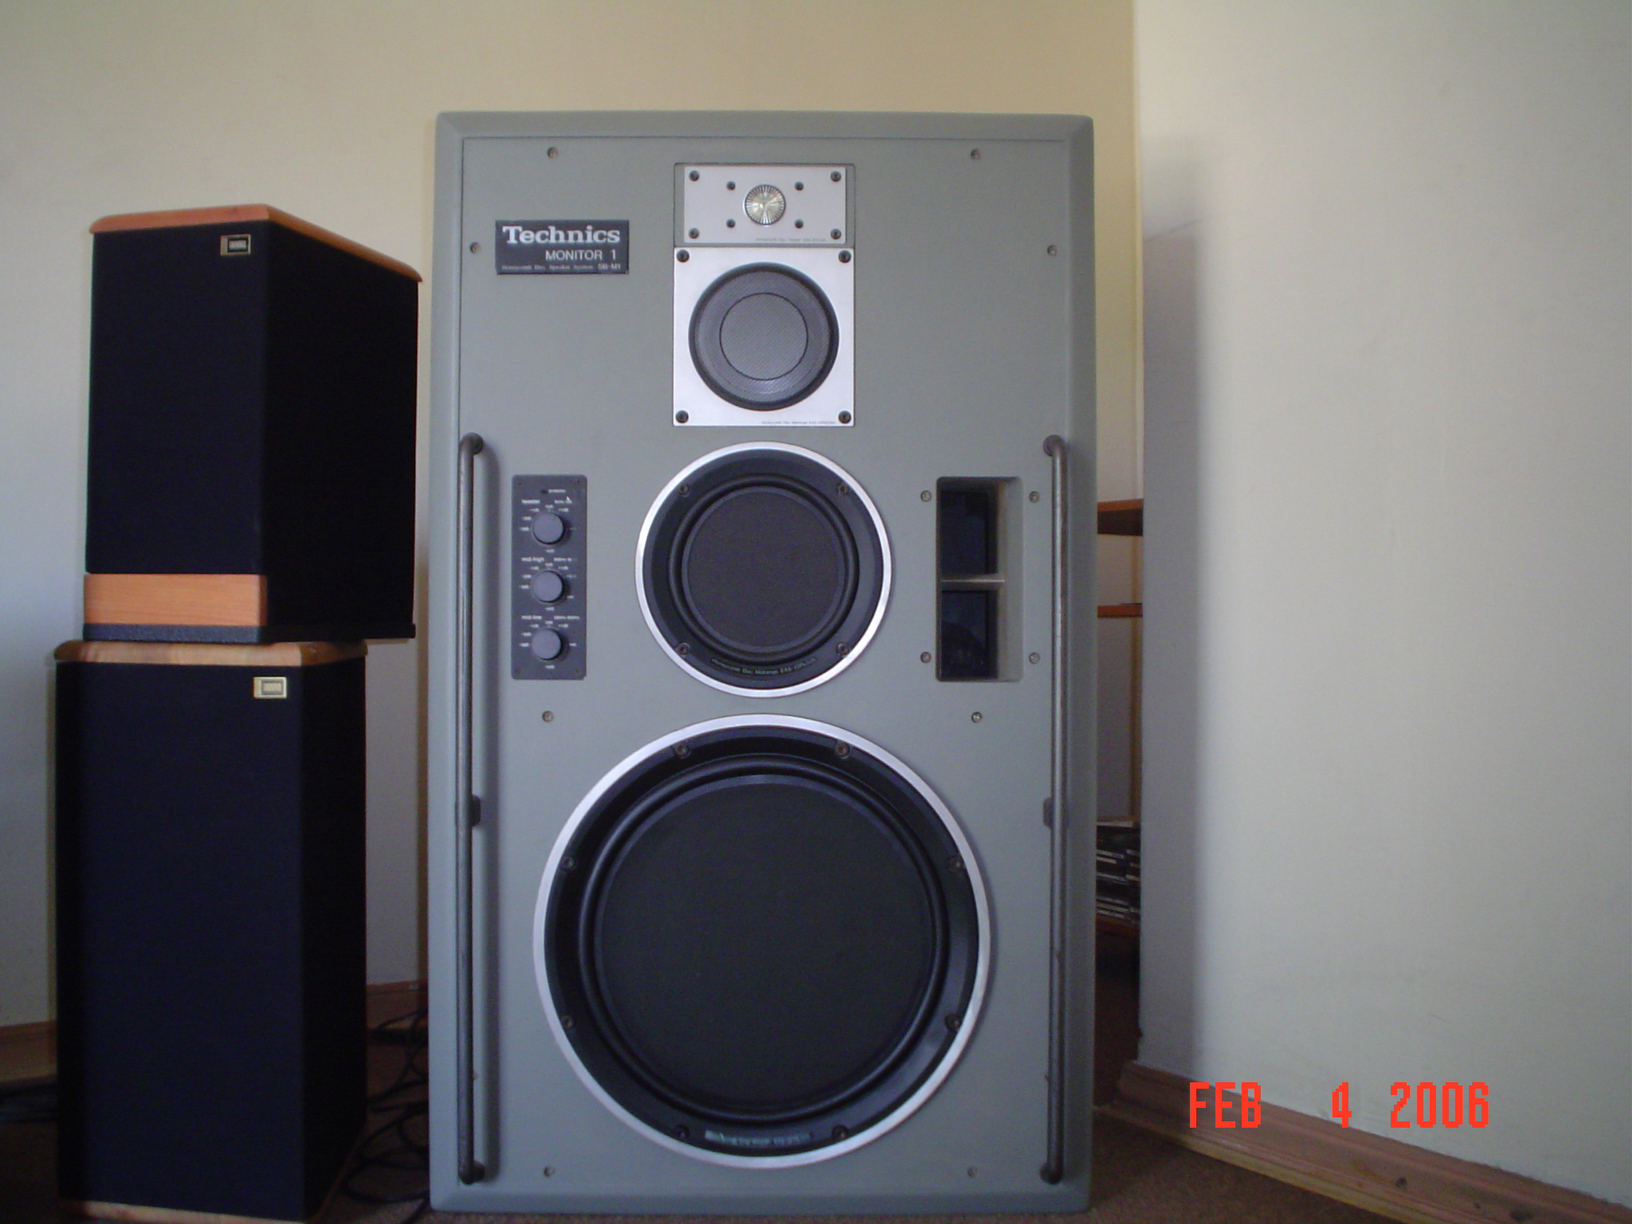
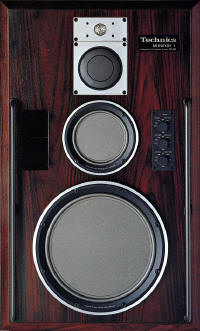
The Cabinet
 The
SB-M1 cabinet is built like a tank with considerable internal bracing. The
SB-M1 cabinet is built like a tank with considerable internal bracing.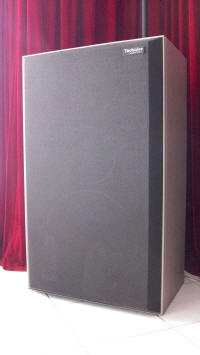 It is immensely heavy and the It is immensely heavy and the baffle is made of 1-1/4 inch thick particle board. The main chamber
is a bass reflex enclosure for the woofer and there are two sealed subchambers, one for the lower mid driver, and the other for the upper mid
driver and the tweeter. All are
lined with heavy sound damping material. Even though the 4 drivers
are mounted in a vertical line the left and right side speaker cabinets
are a mirror image of each other with the bass reflex port, control panel
and Technics badge being on different
baffle is made of 1-1/4 inch thick particle board. The main chamber
is a bass reflex enclosure for the woofer and there are two sealed subchambers, one for the lower mid driver, and the other for the upper mid
driver and the tweeter. All are
lined with heavy sound damping material. Even though the 4 drivers
are mounted in a vertical line the left and right side speaker cabinets
are a mirror image of each other with the bass reflex port, control panel
and Technics badge being on different
 sides. The left side sides. The left side cabinet
is the one with the Technics badge on the right and the right side cabinet
is the one with the badge on the left. Oh, so the setup in my room
is all wrong! Well my back is telling me that is how
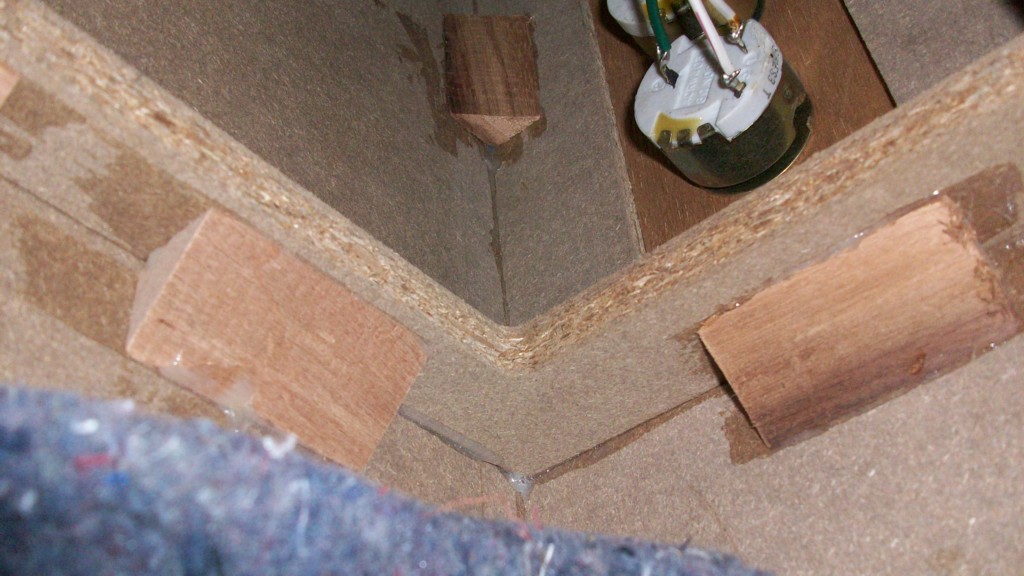
its going to stay! There are four inset lifting handles in the back
and the two rails on the lower front called "Diffuse Poles" can also be
used for moving the SB-M1's around. I did find on my SB-M1's that
the large bolts that hold the center of each diffuse pole in place were
bottomed out and the washers were spinning around. When pulling on
the pole you could see it move in and out, so I had to add three extra
washers to each side. On the back of the cabinet although before the
days of bi-wiring speakers there are two massive terminals for connecting
the speaker wire that can easily accommodate 10 gauge cable and they match
the terminals on the back of an
SE-A3MK2. The Technics SB-M1(s) speakers do actually
have front grills even though they are most often seen with the drivers
exposed. The grills clip onto the diffuse poles to stay in place.
They have a nice angled appearance. cabinet
is the one with the Technics badge on the right and the right side cabinet
is the one with the badge on the left. Oh, so the setup in my room
is all wrong! Well my back is telling me that is how
its going to stay! There are four inset lifting handles in the back
and the two rails on the lower front called "Diffuse Poles" can also be
used for moving the SB-M1's around. I did find on my SB-M1's that
the large bolts that hold the center of each diffuse pole in place were
bottomed out and the washers were spinning around. When pulling on
the pole you could see it move in and out, so I had to add three extra
washers to each side. On the back of the cabinet although before the
days of bi-wiring speakers there are two massive terminals for connecting
the speaker wire that can easily accommodate 10 gauge cable and they match
the terminals on the back of an
SE-A3MK2. The Technics SB-M1(s) speakers do actually
have front grills even though they are most often seen with the drivers
exposed. The grills clip onto the diffuse poles to stay in place.
They have a nice angled appearance.
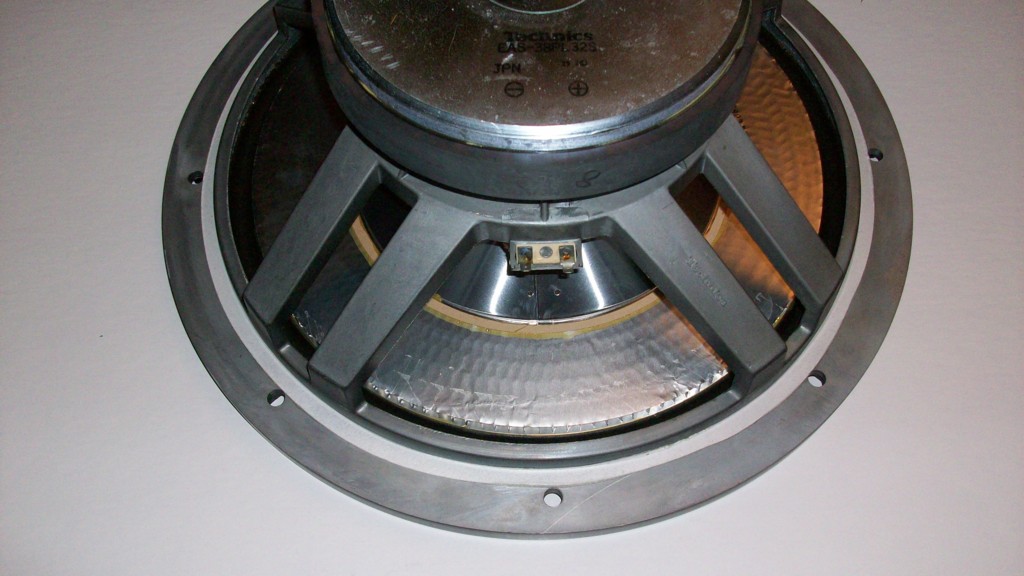
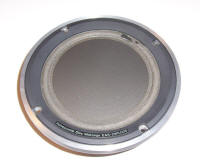
The Drivers
 All four of the drivers are made from the same flat honey combed design
intended to make the diaphragms light but rigid. The two larger
drivers have a foam roll surround while the upper midrange unit has an
inverted surround. Difficult to say much about the tweeter as All four of the drivers are made from the same flat honey combed design
intended to make the diaphragms light but rigid. The two larger
drivers have a foam roll surround while the upper midrange unit has an
inverted surround. Difficult to say much about the tweeter as there is little to be seen except a heavy cast shield built over the
diaphragm. Producing a large high quality and high power moving coil speaker system requires
two main things of the drivers: Dissipation of the heat generated by the voice coils,
and large but light diaphragms. The power and heat dissipation is
managed in two ways, first by the division of labor in implementing a
4-way system and secondly by having a vented magnet on the three larger
drivers. In the case of the tweeter, there is a resetable fuse that
cuts the tweeter out in case of overload. These days such a tweeter
would probably have a ferro-fluid design to
there is little to be seen except a heavy cast shield built over the
diaphragm. Producing a large high quality and high power moving coil speaker system requires
two main things of the drivers: Dissipation of the heat generated by the voice coils,
and large but light diaphragms. The power and heat dissipation is
managed in two ways, first by the division of labor in implementing a
4-way system and secondly by having a vented magnet on the three larger
drivers. In the case of the tweeter, there is a resetable fuse that
cuts the tweeter out in case of overload. These days such a tweeter
would probably have a ferro-fluid design to conduct the heat away. I have to say, this is the heaviest
 tweeter I
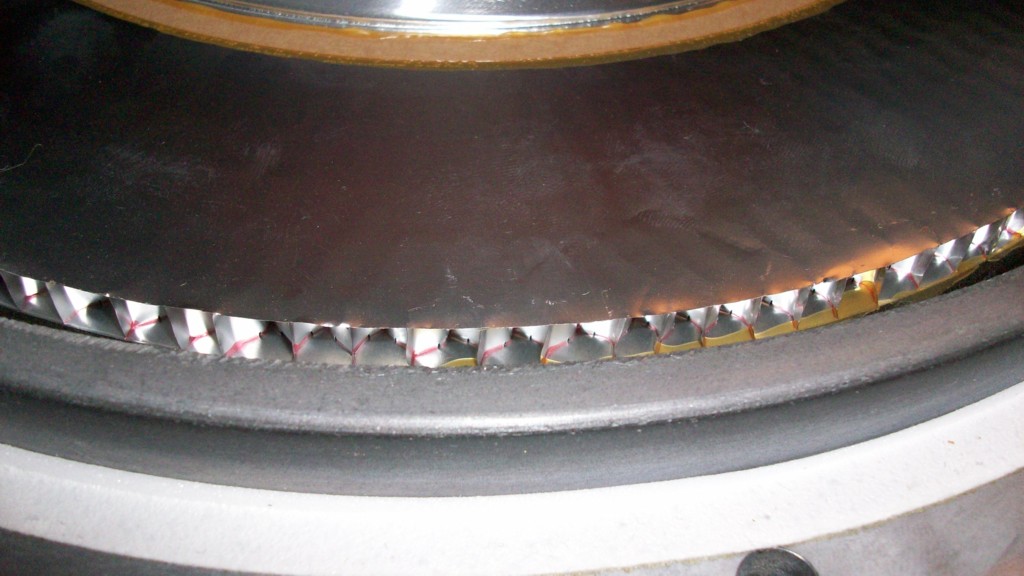
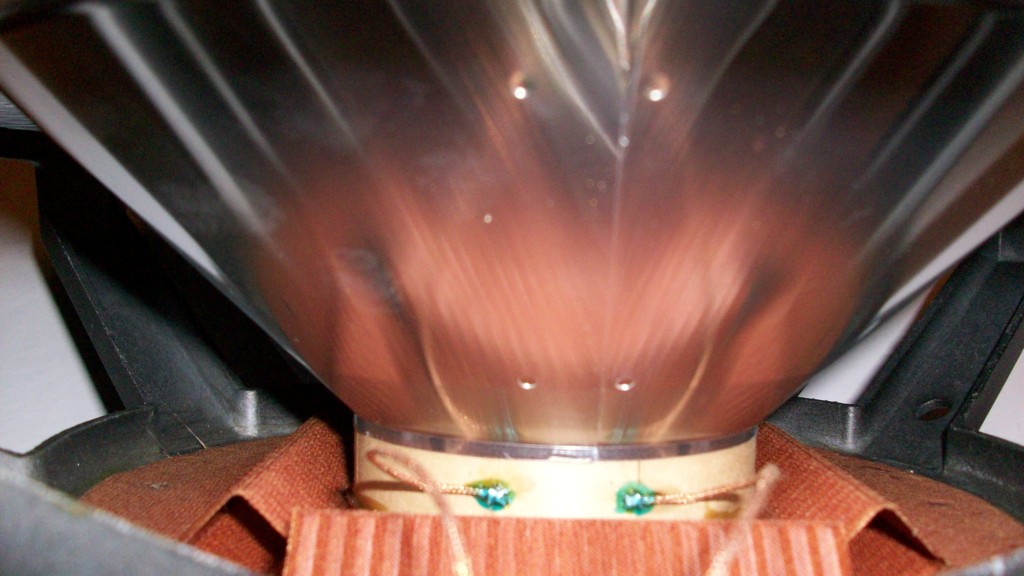
have ever seen, 3 pounds 9 ounces to be exact! The vent on the three larger drivers goes right through the center of the magnet and the back of
the honeycomb disc can be seen through the hole. So in the case of
the bass driver, quite some air passes in and out of the driver when it is
working hard. The issue of providing a large and light diaphragm is
of course achieved with the honeycomb disc. Both the disc on either
side and the actual honeycomb appear to be made from aluminum. Then
on the back there is an aluminum cone that has about half the diameter of
the speaker where it meets the back of the disc. The magnets on each
driver are very large and heavy. The basket or frame of each driver
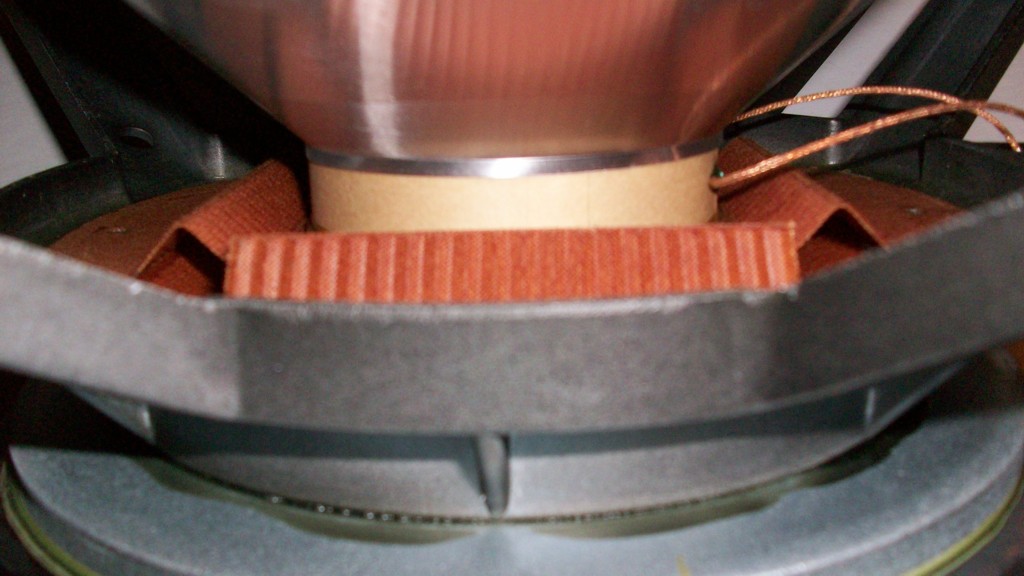
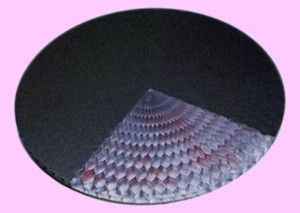
is made from very thick cast aluminum to maintain rigidity. Only the
15" woofer has the funky square orange suspension as shown in the
pictures. tweeter I
have ever seen, 3 pounds 9 ounces to be exact! The vent on the three larger drivers goes right through the center of the magnet and the back of
the honeycomb disc can be seen through the hole. So in the case of
the bass driver, quite some air passes in and out of the driver when it is
working hard. The issue of providing a large and light diaphragm is
of course achieved with the honeycomb disc. Both the disc on either
side and the actual honeycomb appear to be made from aluminum. Then
on the back there is an aluminum cone that has about half the diameter of
the speaker where it meets the back of the disc. The magnets on each
driver are very large and heavy. The basket or frame of each driver
is made from very thick cast aluminum to maintain rigidity. Only the
15" woofer has the funky square orange suspension as shown in the
pictures.
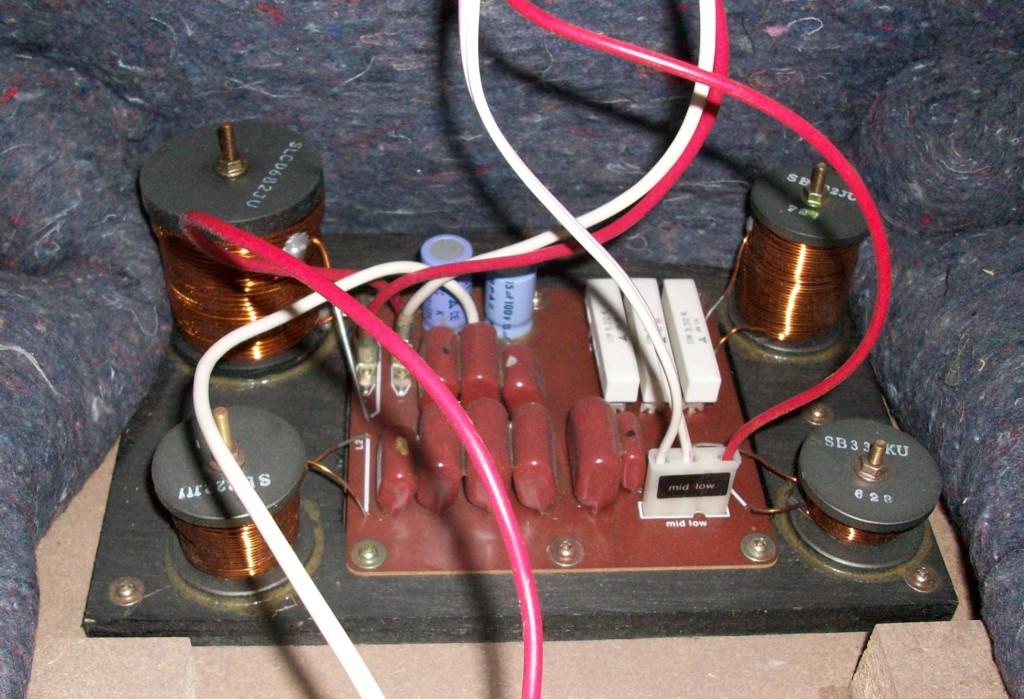
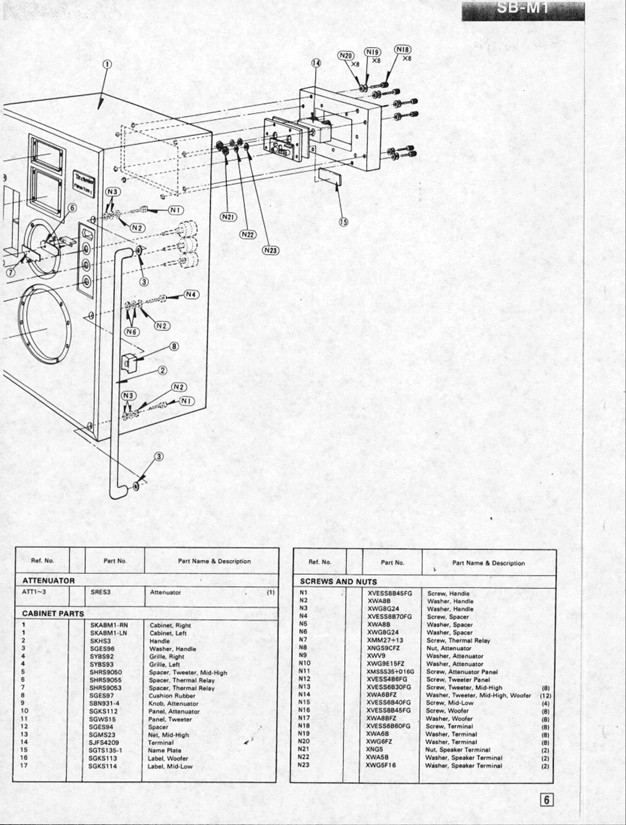
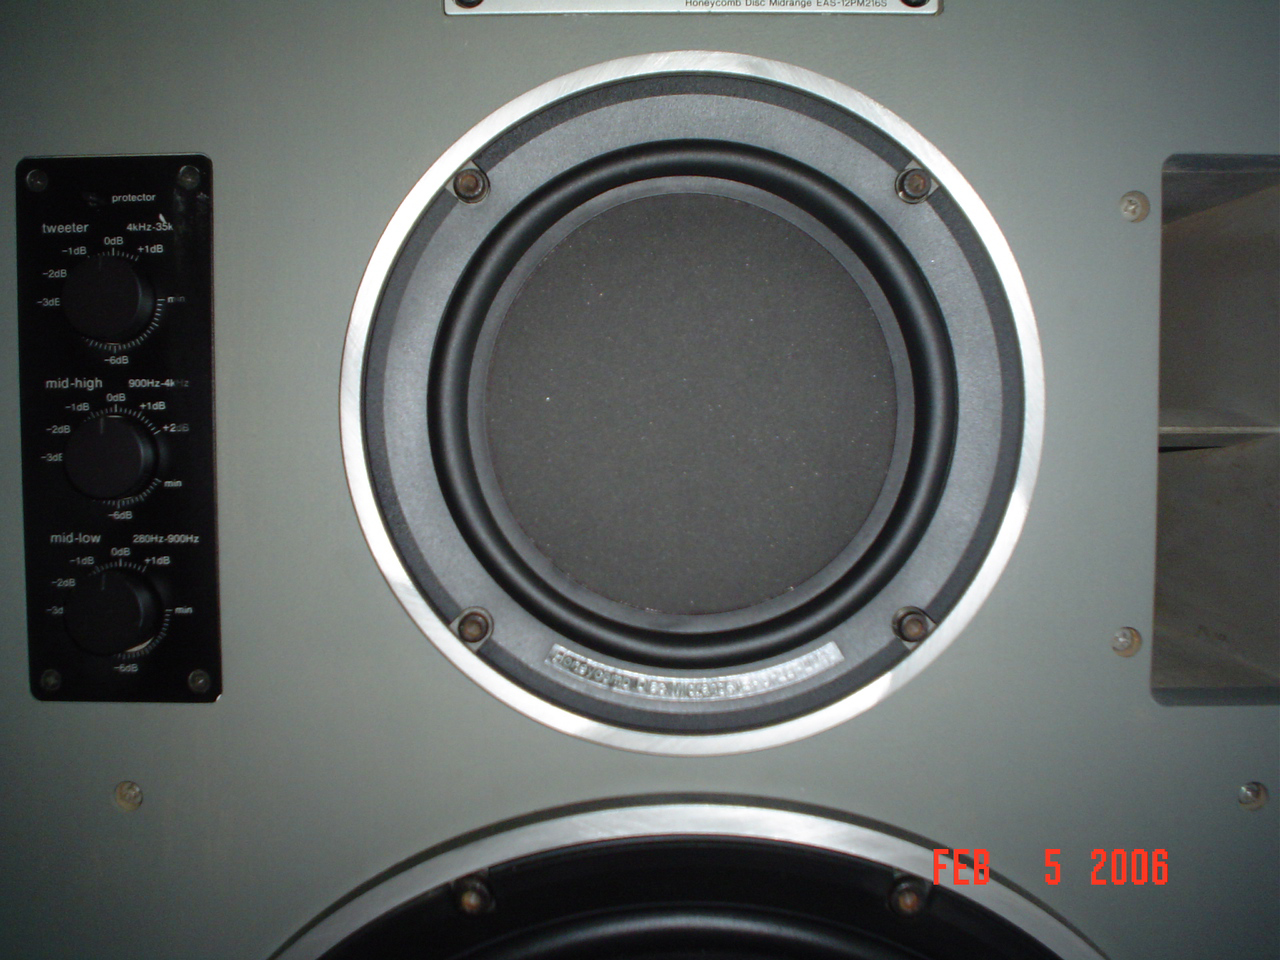
Crossovers and level adjusters
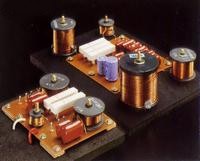 There
are two crossover boards and both are build with very heavy components to
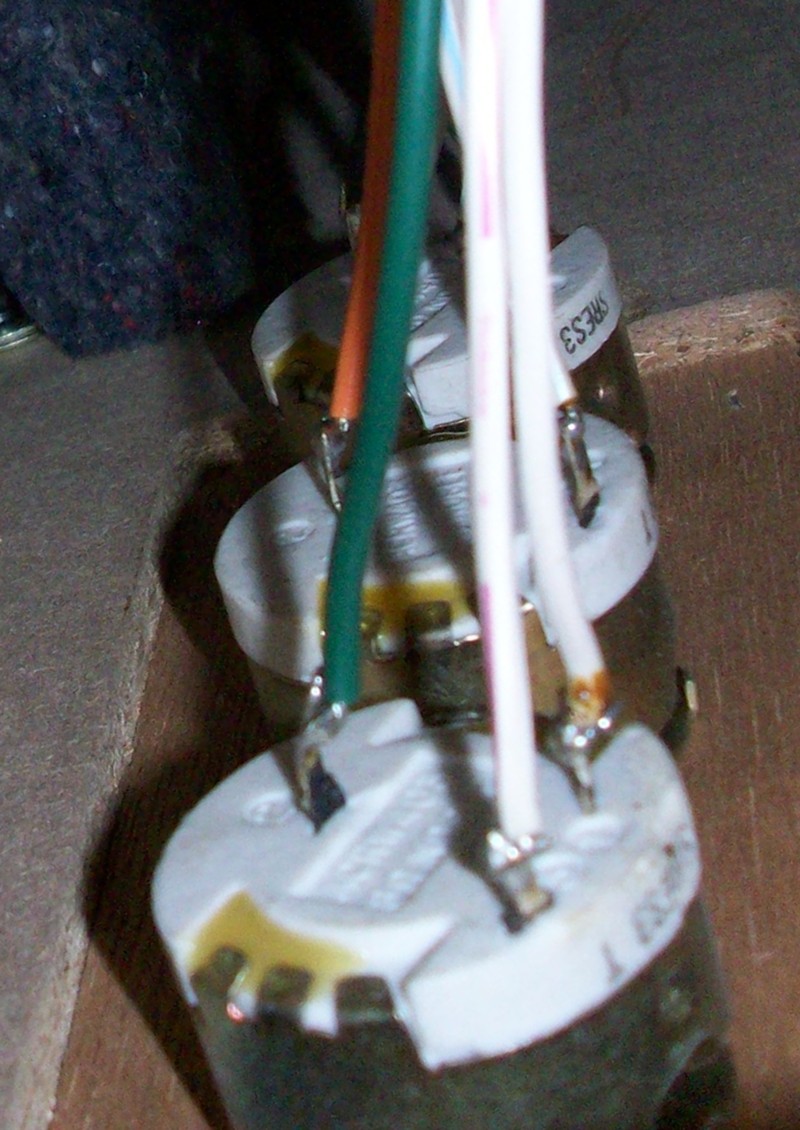
handle all the power. The treble crossover for the tweeter There
are two crossover boards and both are build with very heavy components to
handle all the power. The treble crossover for the tweeter and
high mid range is mounted behind the speaker terminals as shown to the
right. The bass crossover for the woofer and low midrange is mounted
on the floor of the cabinet behind the woofer as shown to the lower right.
The woofer is directly connected from the bass crossover but and
high mid range is mounted behind the speaker terminals as shown to the
right. The bass crossover for the woofer and low midrange is mounted
on the floor of the cabinet behind the woofer as shown to the lower right.
The woofer is directly connected from the bass crossover but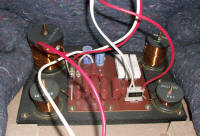 the other
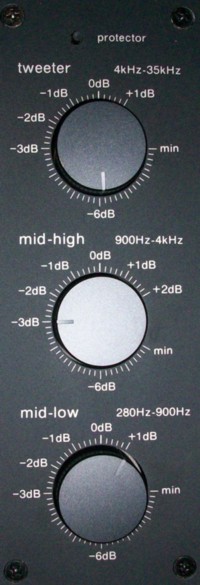
three drivers each have their own level controller mounted on the front
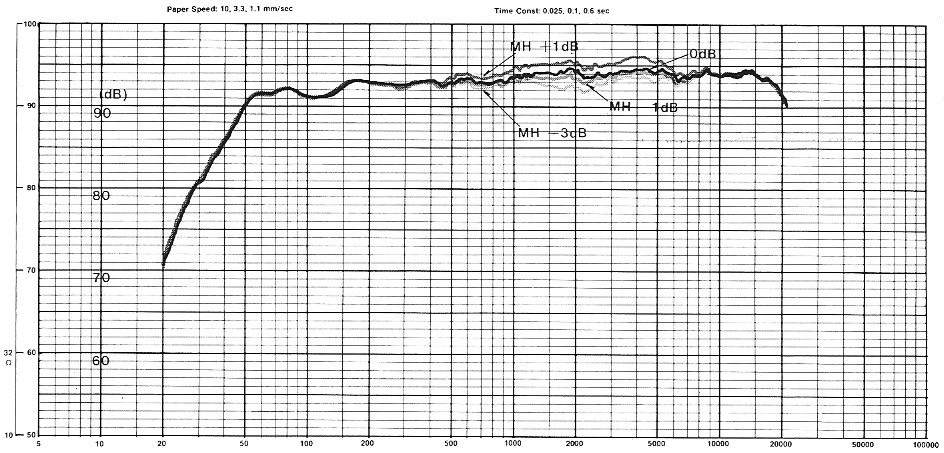
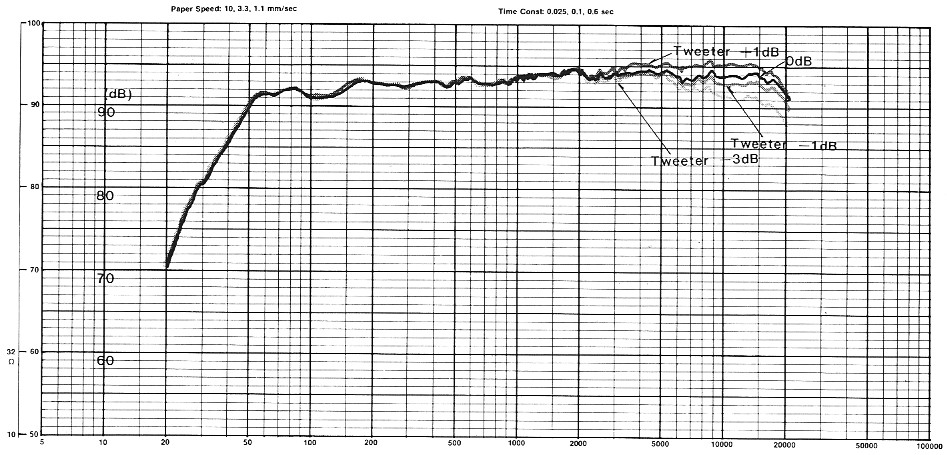
baffle as shown to the left. This provides a range of -9dB to +1dB for
the tweeter and the mid-low driver while the mid-high has a range of -8dB to +2dB. The heavy duty rheostat style potentiometers are mounded
directly through the baffle and the face plate is just screwed over the
top of the knobs. The controls have a nice heavy feel with a soft
click for each mark on the scale. After years of sitting around, the
controls do get a bit dirty and the sound crackles a bit when they are
turned, so I cleaned them all with some switch lubricant. They can
be accessed by removing the woofer and unbolting each one in turn from the
front of the baffle. The contour graphs for each
control are shown below. the other
three drivers each have their own level controller mounted on the front
baffle as shown to the left. This provides a range of -9dB to +1dB for
the tweeter and the mid-low driver while the mid-high has a range of -8dB to +2dB. The heavy duty rheostat style potentiometers are mounded
directly through the baffle and the face plate is just screwed over the
top of the knobs. The controls have a nice heavy feel with a soft
click for each mark on the scale. After years of sitting around, the
controls do get a bit dirty and the sound crackles a bit when they are
turned, so I cleaned them all with some switch lubricant. They can
be accessed by removing the woofer and unbolting each one in turn from the
front of the baffle. The contour graphs for each
control are shown below.
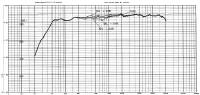
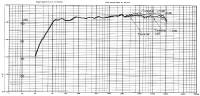
I have to tell you that I had considerable trouble in finding a way to
set these controls properly! Of course the proper way is to compare
the sound with a reference and adjust the controls so that the sound of
the
 SB-M1's
matches the reference as closely as possible. In my opinion there is
no better reference speaker for midrange and treble than the
Quad ESL-63. Unfortunately my
original Quad's were lost by Allied Van Lines on the way to Florida so I
actually had to buy another pair on eBay in order to get the SB-M1's
properly setup. As you can see from the controls on the left, a
setting of -6, -3, +1 from the top down gives the required equalization to
match Quad ESL-63's. This also now makes my reference CD's sound
correct. This all leads me to wonder what reference the SB-M1's were
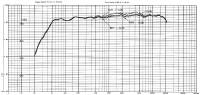
designed to and why the correct setting is not 0, 0, 0. SB-M1's
matches the reference as closely as possible. In my opinion there is
no better reference speaker for midrange and treble than the
Quad ESL-63. Unfortunately my
original Quad's were lost by Allied Van Lines on the way to Florida so I
actually had to buy another pair on eBay in order to get the SB-M1's
properly setup. As you can see from the controls on the left, a
setting of -6, -3, +1 from the top down gives the required equalization to
match Quad ESL-63's. This also now makes my reference CD's sound
correct. This all leads me to wonder what reference the SB-M1's were
designed to and why the correct setting is not 0, 0, 0.
 It does mention
in the user It does mention
in the user
 manual that these settings can be used to compensate for the phono cartridge being used so maybe the cartridges Technics
were shipping with SL-1200's at that time were a bit on the trebly side.
Once I was done, I resold the Quad ESL-63's to a local buyer who happened
to be a professional classical guitarist who was going to use the Quad's
as a studio reference. He commented on how close the SB-M1's sounded
compared to the Quads, so I think I have the correct setting at last!
When set incorrectly, the SB-M1's can really sound quite annoying and it
is probably the case that many potential listeners and buyers have been
put off them because of listening to them with the wrong settings.
Once set, different room settings and locations do not seem make much
difference to the sound of the upper three drivers, it is mainly the bass
that is effected. I can tell you though that when properly setup
they sound simply stunning and -6, -3, +1 is my recommended setting for
digital music sources! Obviously such large and heavy speakers have
tremendous well controlled bass and the three upper drivers do a very good
job of keeping up with the
Quad ESL-63 electrostatic reference.
The other unusual thing about the Technics SB-M1 is that even with all
these crossovers burning power and all these drivers, the average
impedance is 6 ohms rather than 8 and they are quite sensitive at 94 dB/W
at 1 meter. This means that with just an ordinary
SE-A5 they can really rock loud and
not even an SE-A3MK2 can drive
two pairs at the same time. manual that these settings can be used to compensate for the phono cartridge being used so maybe the cartridges Technics
were shipping with SL-1200's at that time were a bit on the trebly side.
Once I was done, I resold the Quad ESL-63's to a local buyer who happened
to be a professional classical guitarist who was going to use the Quad's
as a studio reference. He commented on how close the SB-M1's sounded
compared to the Quads, so I think I have the correct setting at last!
When set incorrectly, the SB-M1's can really sound quite annoying and it
is probably the case that many potential listeners and buyers have been
put off them because of listening to them with the wrong settings.
Once set, different room settings and locations do not seem make much
difference to the sound of the upper three drivers, it is mainly the bass
that is effected. I can tell you though that when properly setup
they sound simply stunning and -6, -3, +1 is my recommended setting for
digital music sources! Obviously such large and heavy speakers have
tremendous well controlled bass and the three upper drivers do a very good
job of keeping up with the
Quad ESL-63 electrostatic reference.
The other unusual thing about the Technics SB-M1 is that even with all
these crossovers burning power and all these drivers, the average
impedance is 6 ohms rather than 8 and they are quite sensitive at 94 dB/W
at 1 meter. This means that with just an ordinary
SE-A5 they can really rock loud and
not even an SE-A3MK2 can drive
two pairs at the same time.
SB-M1 Problems
 Anyone
who has owned or seen a pair of Bose 901's from the 1980's will be all to
familiar with the issue of decaying foam on the surrounds of the drivers.
This issue actually completely decapitates 901's! Well there is good
news and bad news in this respect for the now quarter century old Technics
SB-M1's. The good news is that the foam surround of the 15" bass
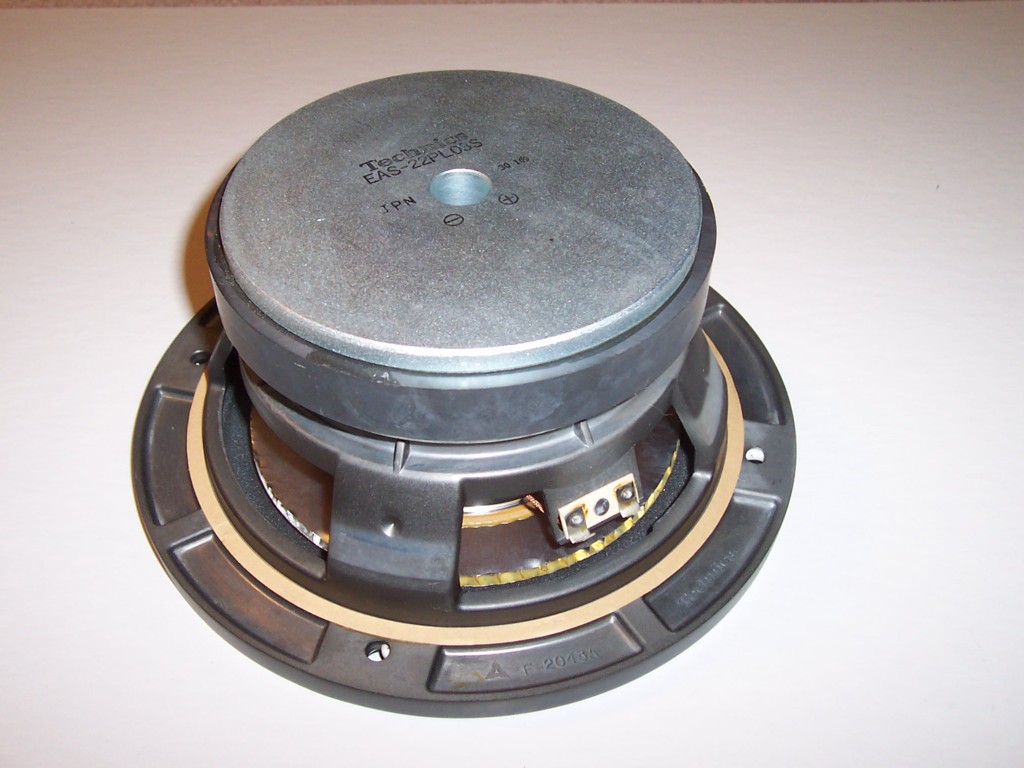
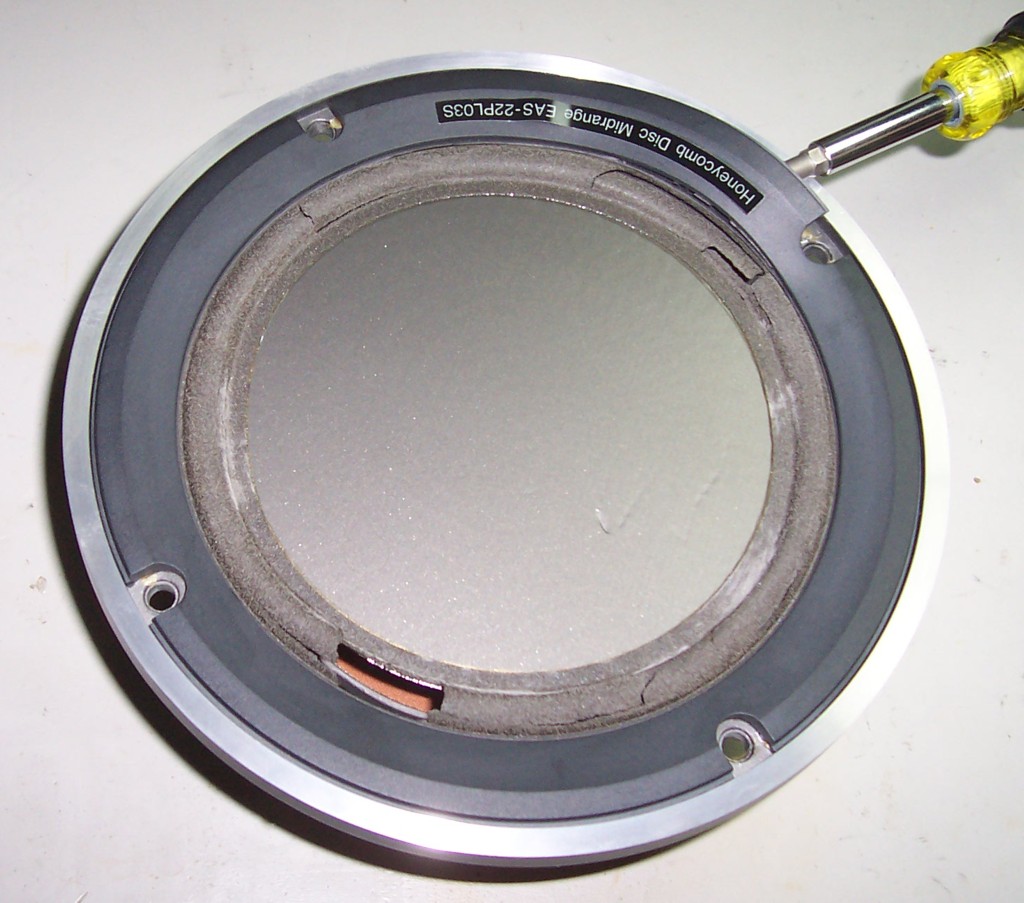
driver is not effected. The bad news is that the 9" Mid-Low
EAS-22PL03S unit
is effected. I have heard the same thing from other SB-M1
owners. It appears that when stored for many years the units come
out looking like new, but after just a little usage the foam just crumbles
and holes start to appear. In the case of the SB-M1 Low-Mid unit,
this actually appears to make very little difference to the units
operation unlike for the Bose 901. The suspension is quite stiff
(not necessarily a good thing for a mid range driver) and it still
operates perfectly well with the entire surround crumbled and gone!
Even so, with the SB-M1's looking so good with the grills off I thought it
worth repairing them just for the cosmetic benefit and the process is
described below. Anyone
who has owned or seen a pair of Bose 901's from the 1980's will be all to
familiar with the issue of decaying foam on the surrounds of the drivers.
This issue actually completely decapitates 901's! Well there is good
news and bad news in this respect for the now quarter century old Technics
SB-M1's. The good news is that the foam surround of the 15" bass
driver is not effected. The bad news is that the 9" Mid-Low
EAS-22PL03S unit
is effected. I have heard the same thing from other SB-M1
owners. It appears that when stored for many years the units come
out looking like new, but after just a little usage the foam just crumbles
and holes start to appear. In the case of the SB-M1 Low-Mid unit,
this actually appears to make very little difference to the units
operation unlike for the Bose 901. The suspension is quite stiff
(not necessarily a good thing for a mid range driver) and it still
operates perfectly well with the entire surround crumbled and gone!
Even so, with the SB-M1's looking so good with the grills off I thought it
worth repairing them just for the cosmetic benefit and the process is
described below.
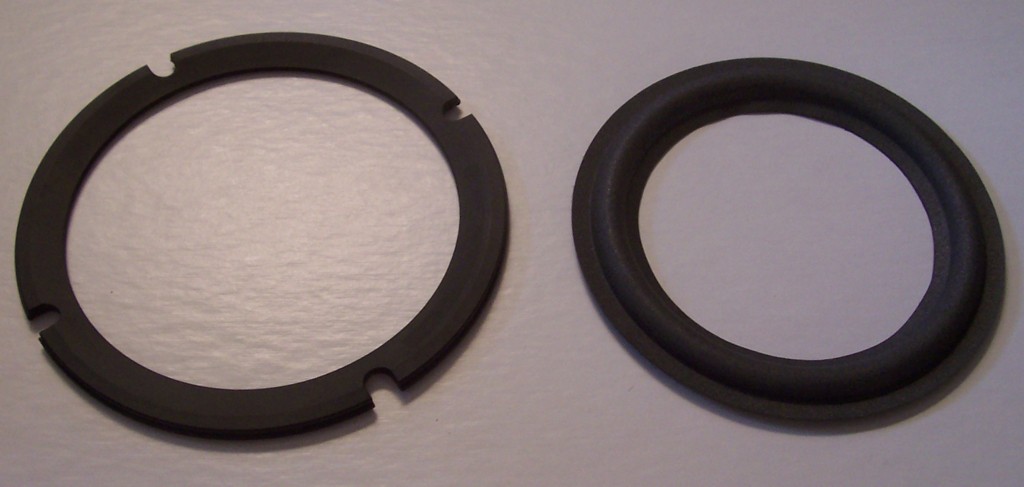
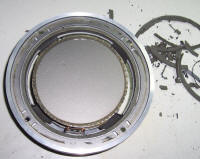
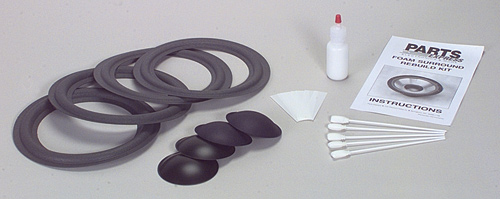 Because
of the Technics SB-M1's rarity there are no specific replacements
available for the foam surround like for the
Bose 901 and others but I have found that the generic
8" kit from Parts Express looks and works just fine even though
the driver is described as 9". The only
minor issue is that the new replacement has a better grey color than the
original foam on the 15" woofer which has a bit of a green tinge to it
although the foam there is in like new condition. Even so, it sure
makes a great improvement to the appearance of the whole speaker system. Because
of the Technics SB-M1's rarity there are no specific replacements
available for the foam surround like for the
Bose 901 and others but I have found that the generic
8" kit from Parts Express looks and works just fine even though
the driver is described as 9". The only
minor issue is that the new replacement has a better grey color than the
original foam on the 15" woofer which has a bit of a green tinge to it
although the foam there is in like new condition. Even so, it sure
makes a great improvement to the appearance of the whole speaker system.
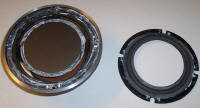
 The
process described here is not quite the same as in the Parts Express
instructions. The first step is to The
process described here is not quite the same as in the Parts Express
instructions. The first step is to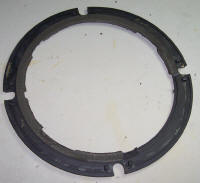 remove the driver from the cabinet. This requires a 5mm hex key
(Allen key for the English). Undo one of the bottom hex bolts last
as the driver may just fall out. Make a note of which color wire is
connected to the + terminal on the speaker (Red on my units). Be
careful not to damage the flat diaphragm surface when the driver comes
out. The magnet is big and heavy and the unit is completely
unbalanced with regard to its centre of gravity! Pull off the
connectors and place the unit on its back on your work bench. Then
remove the front gasket with a screwdriver. It is just stuck on with
some glue and the whole thing has to come off. Be careful not to
damage the front surface. Although located where the front gasket is
on a regular speaker, it is not really a gasket at all but
rather a decorative trim. Clean off any foam from the back.
remove the driver from the cabinet. This requires a 5mm hex key
(Allen key for the English). Undo one of the bottom hex bolts last
as the driver may just fall out. Make a note of which color wire is
connected to the + terminal on the speaker (Red on my units). Be
careful not to damage the flat diaphragm surface when the driver comes
out. The magnet is big and heavy and the unit is completely
unbalanced with regard to its centre of gravity! Pull off the
connectors and place the unit on its back on your work bench. Then
remove the front gasket with a screwdriver. It is just stuck on with
some glue and the whole thing has to come off. Be careful not to
damage the front surface. Although located where the front gasket is
on a regular speaker, it is not really a gasket at all but
rather a decorative trim. Clean off any foam from the back.
 The
next part is real messy! There will be stick and dust all over if
you are not careful! All the remaining foam has to be scraped from
the speaker basket surround and from the diaphragm surface. I found
that scraping with a craft
knife the best way to do this. The old glue on the diaphragm edge is
quite sticky and the crumbling foam mixes with it to produce a sticky
black mess. After the scraping is done, clean off any remaining old
glue with some Goof Off.
Even with the surround missing, the diaphragm is quite stable and you do
not need to use the shims provided with the kit. Even so, hold the
honeycomb disc diaphragm with your finger and thumb when scraping around
the edge. Do not let the voicecoil rub against the magnet. The
next part is real messy! There will be stick and dust all over if
you are not careful! All the remaining foam has to be scraped from
the speaker basket surround and from the diaphragm surface. I found
that scraping with a craft
knife the best way to do this. The old glue on the diaphragm edge is
quite sticky and the crumbling foam mixes with it to produce a sticky
black mess. After the scraping is done, clean off any remaining old
glue with some Goof Off.
Even with the surround missing, the diaphragm is quite stable and you do
not need to use the shims provided with the kit. Even so, hold the
honeycomb disc diaphragm with your finger and thumb when scraping around
the edge. Do not let the voicecoil rub against the magnet.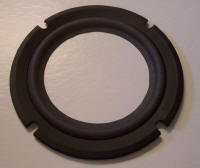 It is not necessary to get a perfect finish on the diaphragm front as the
inner diameter of the new foam surround is slightly less than that of the
original, so none of the mess will show when its done.
It is not necessary to get a perfect finish on the diaphragm front as the
inner diameter of the new foam surround is slightly less than that of the
original, so none of the mess will show when its done.
 After
the foam has been sufficiently cleaned, new the new foam surround can be
fitted. This is done using the lightweight contact adhesive supplied
with the kit. Contact adhesive works by being applied to both
surfaces, drying for about five minutes, then bringing the two surfaces
together into contact with each other when the adhesive is still tacky.
First apply glue to the top outer side of the new foam surround and to the
back side of the gasket where the foam will touch. The gasket makes
a snug fit over the foam surround. Leave the glue to become almost
transparent and tacky for about 5 minutes. Then fit the gasket over
the surround and press the glued surfaces together. Make sure the
foam surround is pushed all the way through the gasket all the way around.
Don't worry about any glue that shows through, it will dry clear. After
the foam has been sufficiently cleaned, new the new foam surround can be
fitted. This is done using the lightweight contact adhesive supplied
with the kit. Contact adhesive works by being applied to both
surfaces, drying for about five minutes, then bringing the two surfaces
together into contact with each other when the adhesive is still tacky.
First apply glue to the top outer side of the new foam surround and to the
back side of the gasket where the foam will touch. The gasket makes
a snug fit over the foam surround. Leave the glue to become almost
transparent and tacky for about 5 minutes. Then fit the gasket over
the surround and press the glued surfaces together. Make sure the
foam surround is pushed all the way through the gasket all the way around.
Don't worry about any glue that shows through, it will dry clear.
 Next
after the gasket and surround have dried for about an hour, the gasket and
surround can be glued to the basket and diaphragm at the same time.
Don't try to do this in two separate steps! Try putting the gasket
and surround in place to see how it will look and make sure everything is
OK. The gasket has 8 locators to lock it in place. Next remove
the gasket and surround and apply glue to the inner back rim of the foam
surround ONLY. Immediately with the glue still wet and white, lock
the gasket into position on the speaker basket and then lift the diaphragm
a little from underneath so it touches the wet glue on the back of the Next
after the gasket and surround have dried for about an hour, the gasket and
surround can be glued to the basket and diaphragm at the same time.
Don't try to do this in two separate steps! Try putting the gasket
and surround in place to see how it will look and make sure everything is
OK. The gasket has 8 locators to lock it in place. Next remove
the gasket and surround and apply glue to the inner back rim of the foam
surround ONLY. Immediately with the glue still wet and white, lock
the gasket into position on the speaker basket and then lift the diaphragm
a little from underneath so it touches the wet glue on the back of the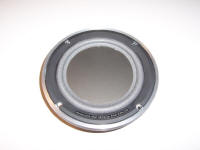 surround all the way around. Then immediately remove the gasket and
surround. Now you will see a white ring of glue on the diaphragm
edge in the exact right location. Swab it around and add any extra
glue needed. Now apply glue to the outer back side of the gasket and
to the speaker basket. Reapply any extra needed glue to the inner
rim of the back of the foam surround and to the front of the diaphragm
edge where the glue mark was previously made. Don't add too much
glue so it goes more to the center of the front of the diaphragm as it
will be seen when the job is complete. Leave the glue to become
almost transparent and tacky for about 5 minutes. Then press the
gasket and surround back onto the speaker basket and lock into place.
With finger and thumb, gently go all around the diaphragm bottom and foam
top and press them together. Don't worry if a small amount of glue
is squeezed out as it will dry transparently. After about an hour,
the speaker can be replaced in the cabinet and tested.
surround all the way around. Then immediately remove the gasket and
surround. Now you will see a white ring of glue on the diaphragm
edge in the exact right location. Swab it around and add any extra
glue needed. Now apply glue to the outer back side of the gasket and
to the speaker basket. Reapply any extra needed glue to the inner
rim of the back of the foam surround and to the front of the diaphragm
edge where the glue mark was previously made. Don't add too much
glue so it goes more to the center of the front of the diaphragm as it
will be seen when the job is complete. Leave the glue to become
almost transparent and tacky for about 5 minutes. Then press the
gasket and surround back onto the speaker basket and lock into place.
With finger and thumb, gently go all around the diaphragm bottom and foam
top and press them together. Don't worry if a small amount of glue
is squeezed out as it will dry transparently. After about an hour,
the speaker can be replaced in the cabinet and tested.
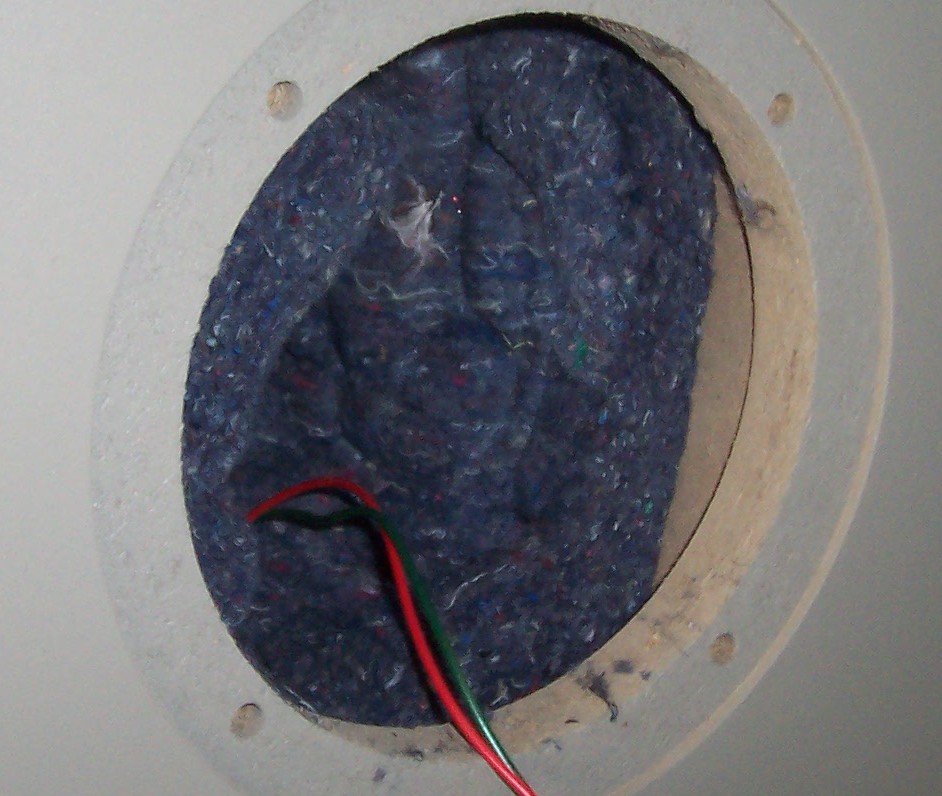
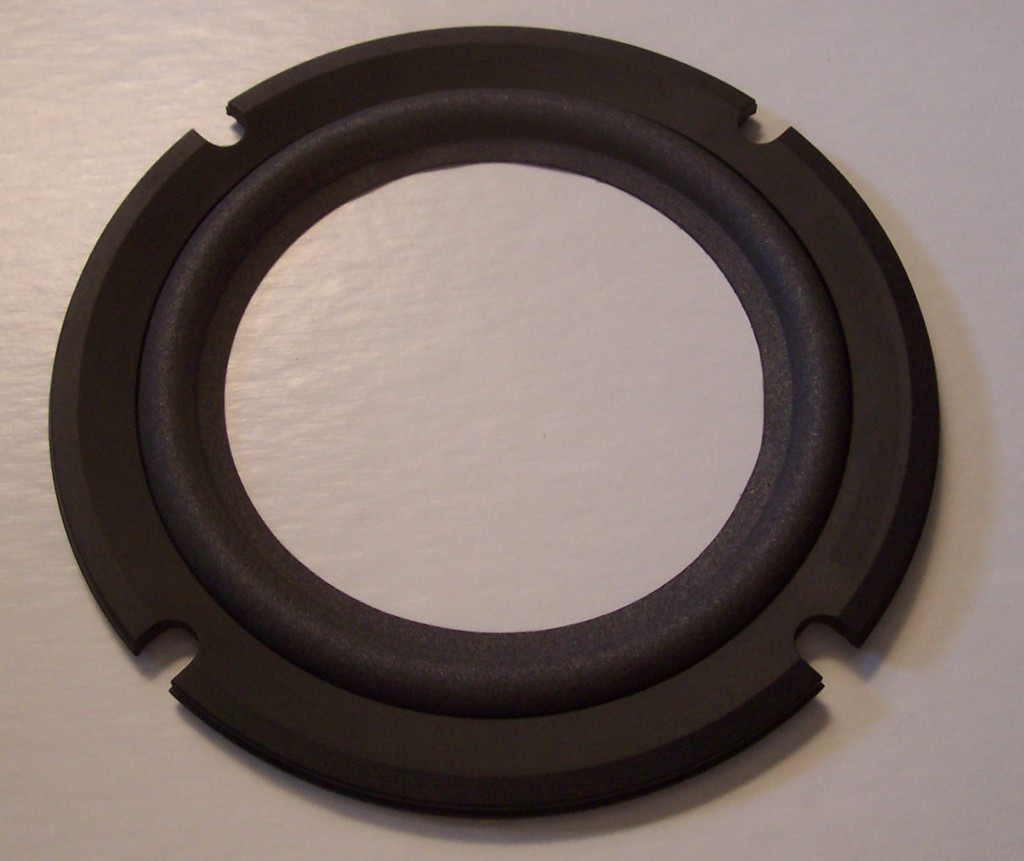
Well now that I'm looking at it I see that the four foam surrounds
provided in the Parts Express kit are in fact two different pairs.
The other pair are of a slightly lower profile and also a bit darker in
color. Those would have probably been a better match with the
surround on the woofer of the SB-M1's but I guess I'll just leave them as
they are now. I can always change them again later if I need to.
So at the very least, you should make sure you have a proper pair before
you start.  Knowing
this, you can just about see the two different pairs in the photo above. Knowing
this, you can just about see the two different pairs in the photo above.
SB-M1(s) Specifications
| Type |
4 way 4 speaker system |
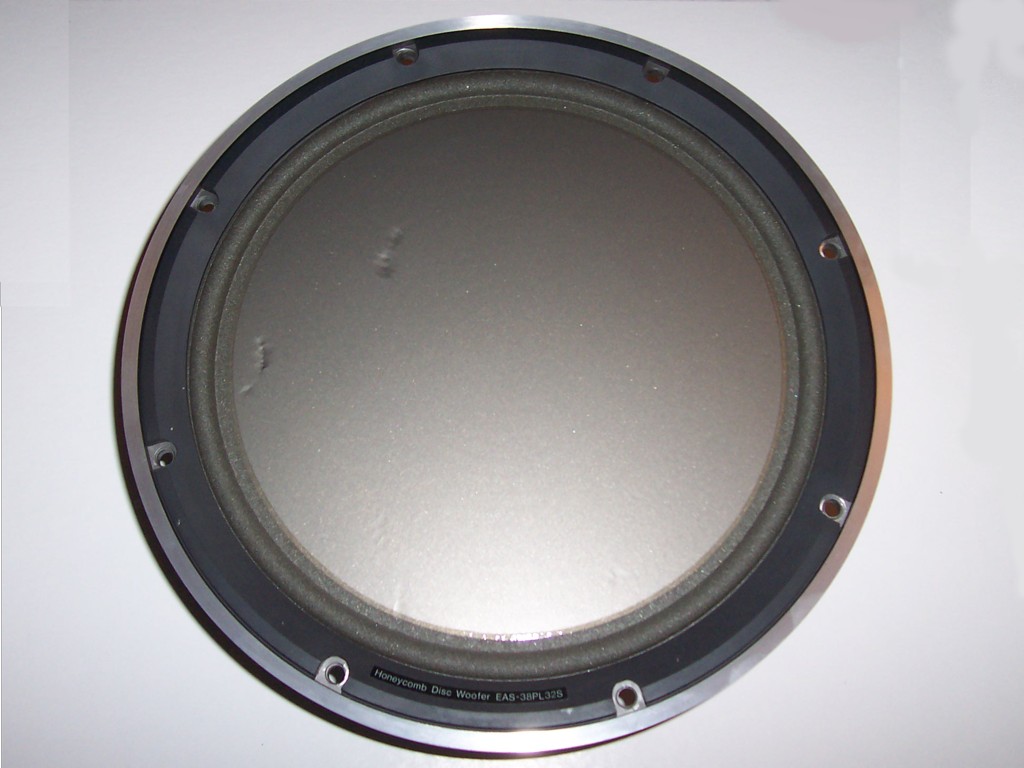
| Woofer EAS-38PL32S |
15" (38 cm) Honeycomb Disc |
| Mid-low EAS-22PL03S |
9" (22 cm) Honeycomb Disc |
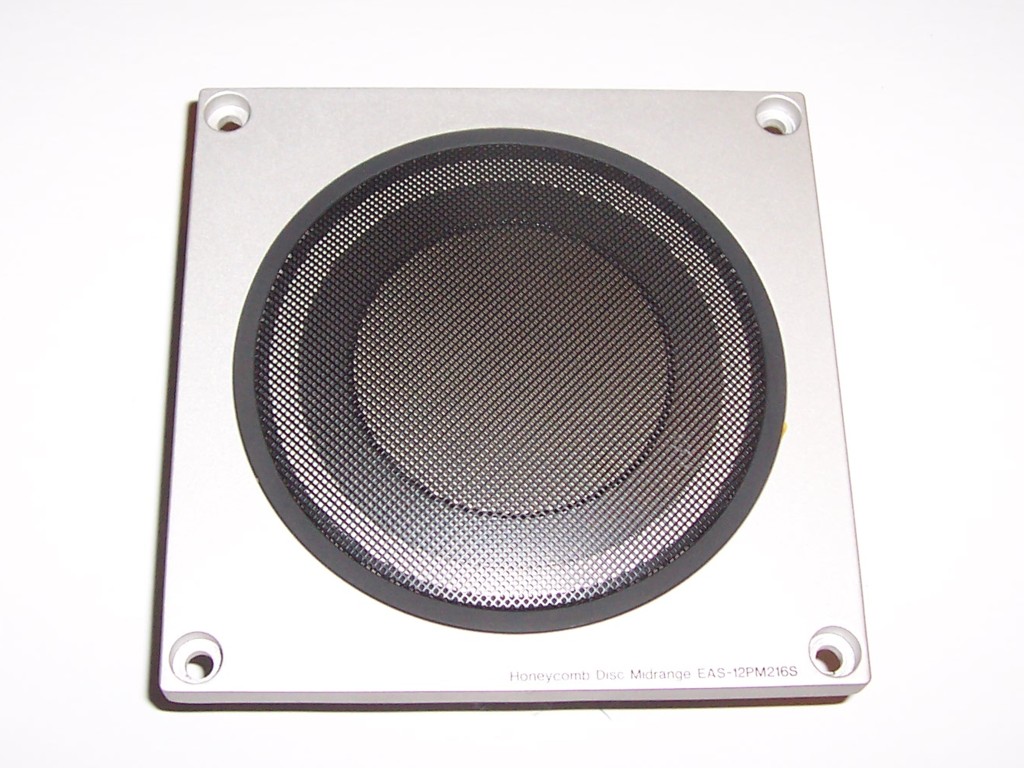
| Mid-High EAS-12PM216S |
3-1/8" (8 cm) Honeycomb Disc |
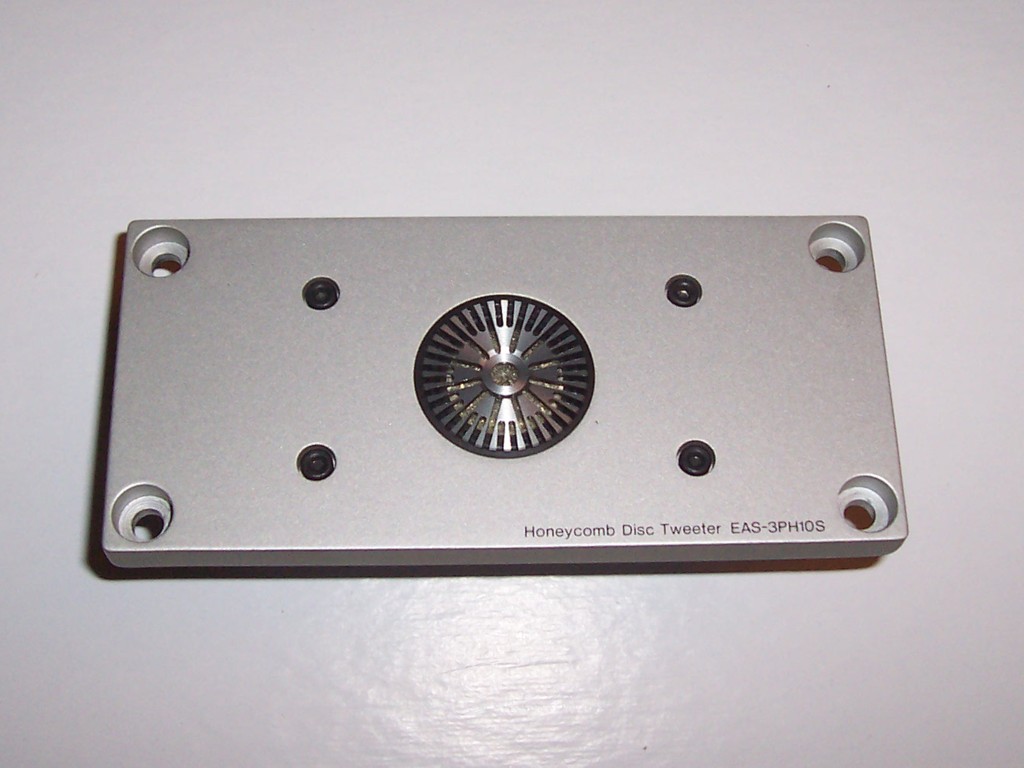
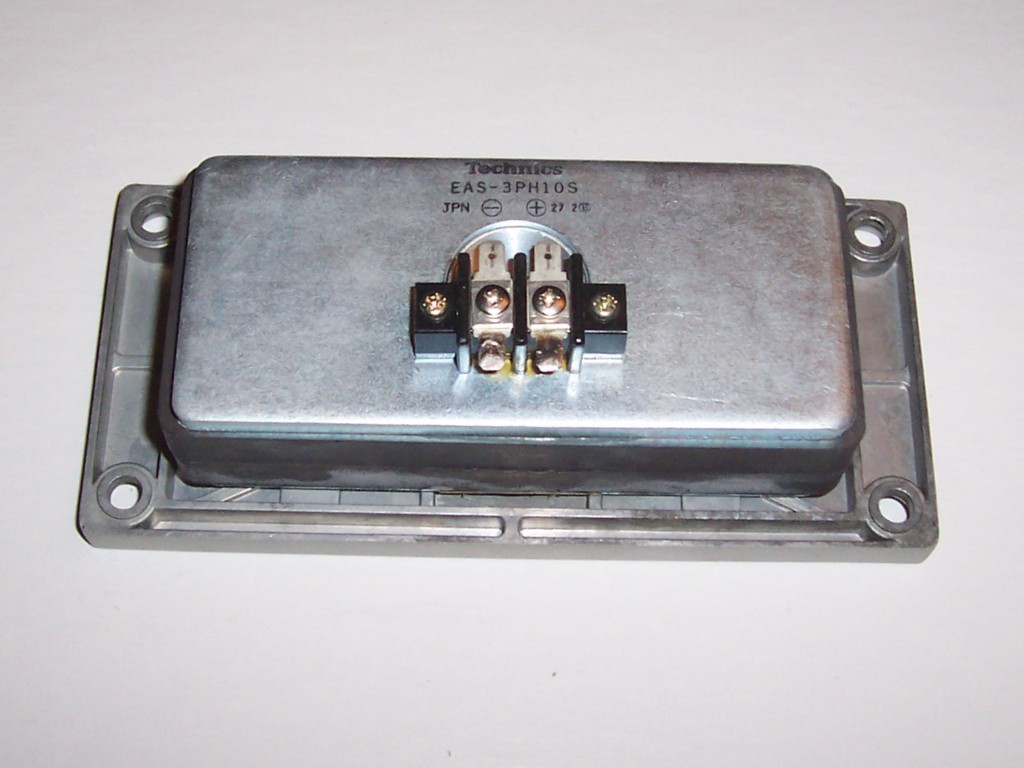
| Tweeter EAS-3PH10S |
1-1/8" (2.8 cm) Honeycomb Disc |
| Impedance |
6 ohms |
| Input Power Music |
350W |
| Input Power DIN |
150W |
| Output Sound Pressure |
94 dB/Watt at 1 meter |
| Crossover Frequencies |
280Hz, 900Hz, 4000Hz |
| Frequency Range |
25Hz~38kHz (-16dB)
35Hz~35kHz (-10dB) |
| Dimensions |
24-13/16" (W) x 41-11/32 (H) x 17-9/32" (D)
63.0 (W) x 105.0 (H) x 43.9 (D) cm |
| Weight |
188.5 lbs (85.5 kg) |
SB-M2
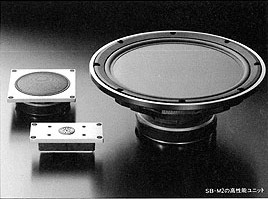 Well
another way to avoid the problems of the EAS-22PL03S Mid-Low driver is to
go for SB-M2's rather than the M1. These slightly smaller speakers
are effectively the same as the SB-M1 although slightly shorter and are a
3-way design without the EAS-22PL03S driver. The power handling is
reduced from 150 watts to 130 watts and the crossover frequencies are
750Hz and 4kHz. So for the tweeter everything is the same as for the
SB-M1 but now the Mid-High (or just Mid in this case) EAS-12PM216S has to
go down to 750Hz from 900Hz and the EAS-38PL32S woofer has to go all the
way up to 750Hz from just 280Hz on the SB-M1. Although I don't know,
I would venture to say that the SB-M2's probably sound better than the
SB-M1 just because there are less crossovers and drivers. If you
know anything about this, please let
me know. Well
another way to avoid the problems of the EAS-22PL03S Mid-Low driver is to
go for SB-M2's rather than the M1. These slightly smaller speakers
are effectively the same as the SB-M1 although slightly shorter and are a
3-way design without the EAS-22PL03S driver. The power handling is
reduced from 150 watts to 130 watts and the crossover frequencies are
750Hz and 4kHz. So for the tweeter everything is the same as for the
SB-M1 but now the Mid-High (or just Mid in this case) EAS-12PM216S has to
go down to 750Hz from 900Hz and the EAS-38PL32S woofer has to go all the
way up to 750Hz from just 280Hz on the SB-M1. Although I don't know,
I would venture to say that the SB-M2's probably sound better than the
SB-M1 just because there are less crossovers and drivers. If you
know anything about this, please let
me know.
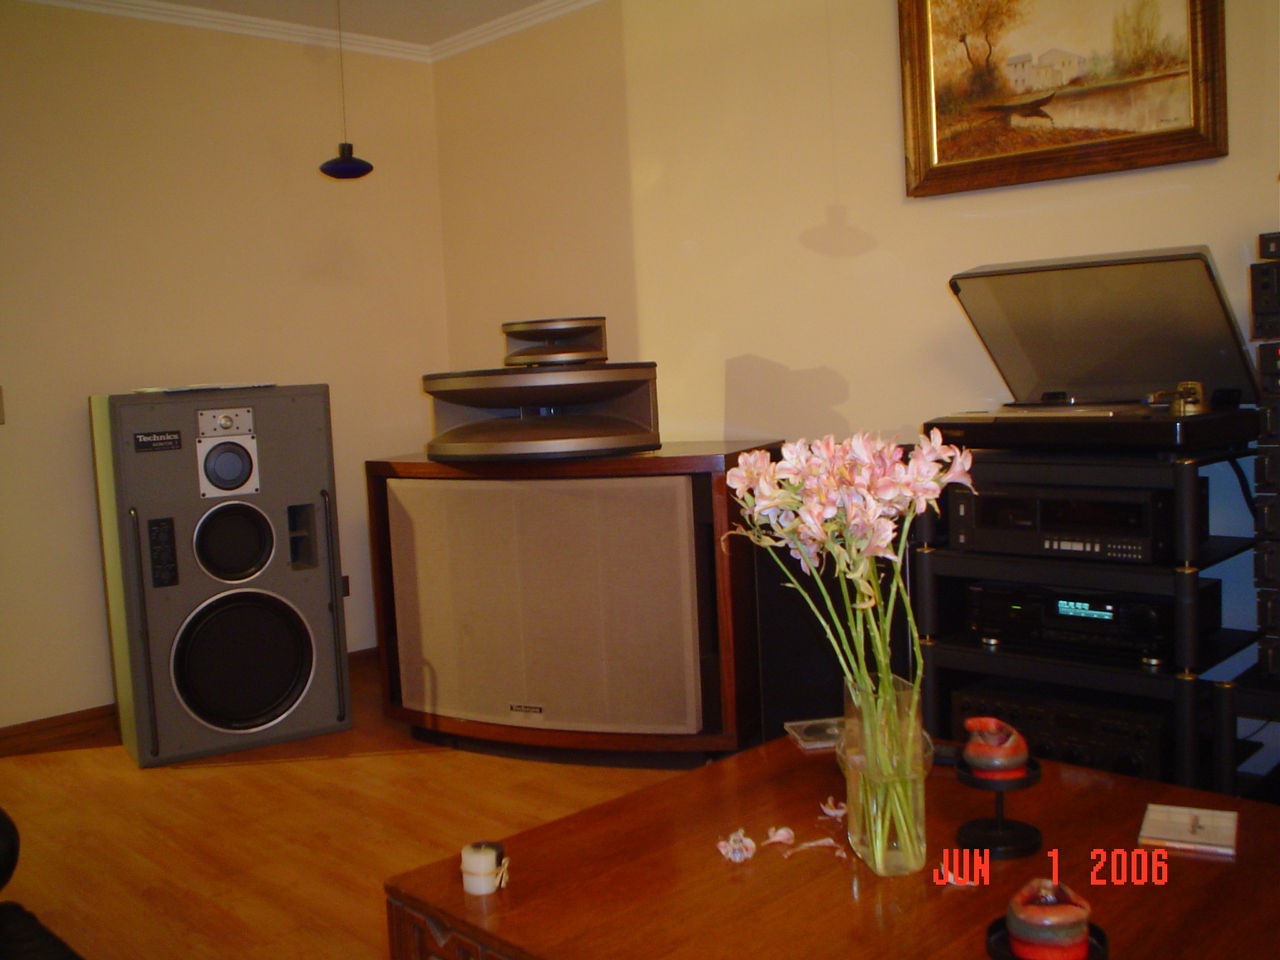
Pictures & Reference
Technics SB-M1 Speakers For Sale
I sometimes have SB-M1's for sale that I have refurbished or acquired by
other means. If there are
any, the following pages are what I prepare for eBay auctions and these items
may or may not be currently listed for sale on eBay but you can find out by
clicking
here to see my current eBay auctions. If you would like to buy a pair
that is listed here
please let me know. I accept payments by credit card (PayPal), cashiers check or money
order. If you have a pair of Technics SB-M1's that you would like to sell
in the USA,
please let me know and I'll come and pick them up!
SOLD
Technics SB-M1(S) SOLD
SOLD
Technics SB-M1(S) BA2216A017 &
SB-M1(S) BA2216A018 SOLD
|